 US Multicraft
 EU Multicraft
 Aus Multicraft
Every server owner has access to the Click and Play Installer through their Multicraft panel.
This can be used to change/install/uninstall up to three different Minecraft servers.
Contents
- What is a "Click and Play Installer"
- How to Find the Instance Manager
- Installing a New Server Instance
- Changing Between Server Instances
- Server Version Updates
- Additional Tasks
- Further Reading and External Links
What is a "Click and Play Installer"
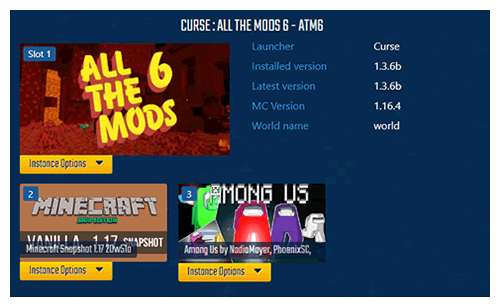
Every Minecraft server hosted with StickyPiston allows you to have three server instances with only having to pay for one server. Instances are just different versions of Minecraft or modpacks. They can be anything you like and we will always provide support for finding and installing versions or modpacks that are not in our library yet.
You can switch between any type of Minecraft server with ease using the instance manager.
For example, you could have a set up like the one here:
Instance 1: Custom Modpack you have made
Instance 2: Vanilla Minecraft
Instance 3: Bukkit Server with plugins
These can mixed and matched as you like. You could have three of your own packs, different versions of Vanilla Minecraft, your two favourite modpacks and one with plugins or any other combination. Only one of the three instances can be active at any given moment.
Any minigame or modpack that can be found on our trial services at trial.stickypiston.co can be installed with the Click & Play installer.
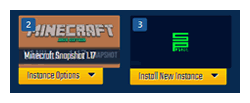
How to Find The Instance Manager
The instance manager is in a slightly place depending on if you are on a phone, tablet, laptop, or desktop. Below is a picture what the instance manager looks like for desktop and phones.

Installing a New Server Instance
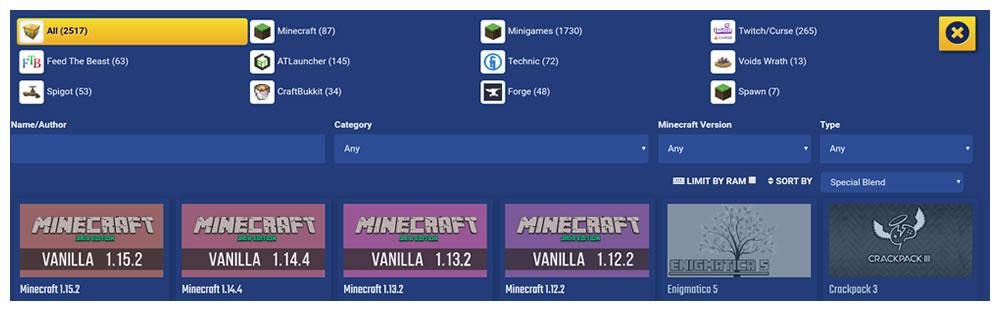
Use the steps below to install a new server instance:
- Open the Multicraft server panel.
-
Click the
Instance Optionsbutton and selectReinstallto install in that current instance slot or clickInstall New Instanceto install in an empty slot.
-
Use the search box and launcher filters to find the instance you wish to install.
- Some Minecraft servers require more memory than others to start and run lag free.
-
If you want to guarantee a smooth server experience then tick the box next to
Limit by RAM -
To play servers not available to your package you can upgrade your memory:
Upgrading and Downgrading Your Server Memory
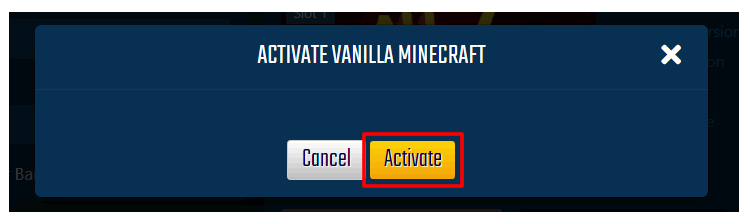
-
Click the image of the version you wish to install and then click the big green
Installbutton. -
Click the
Installbutton in the confirmation popup. - If you want to play on the server you just installed, read the steps on how to change the active instance.
Changing Active Server Instance
If you have more than one instance installed on your server you can use the instance manager to switch between them with ease.
This allows you and your friends to play different types of Minecraft in minutes.
Follow these steps to switch between instances:
- Open the Multicraft server panel.
-
Click the
Instance Optionsbutton and selectActivateto make that instance active.

-
Confirm the activation by clicking
Activateagain in the popup.
- Start your server.
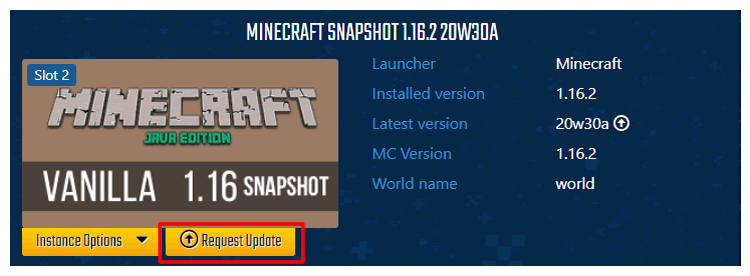
Server Version Updates
Modpacks are constantly updating and you can request an update to one of your instances from within the instance manager to make sure everything stays up to date on all your instances.
If a server update is available you will see a Request Update beneath the image.
Click the Request Update button to send us a support ticket and our technical team will update your server version for you.
Additional Tasks
There are a few additional functions of the Click & Play Manager that will make managing certain instances even easier.
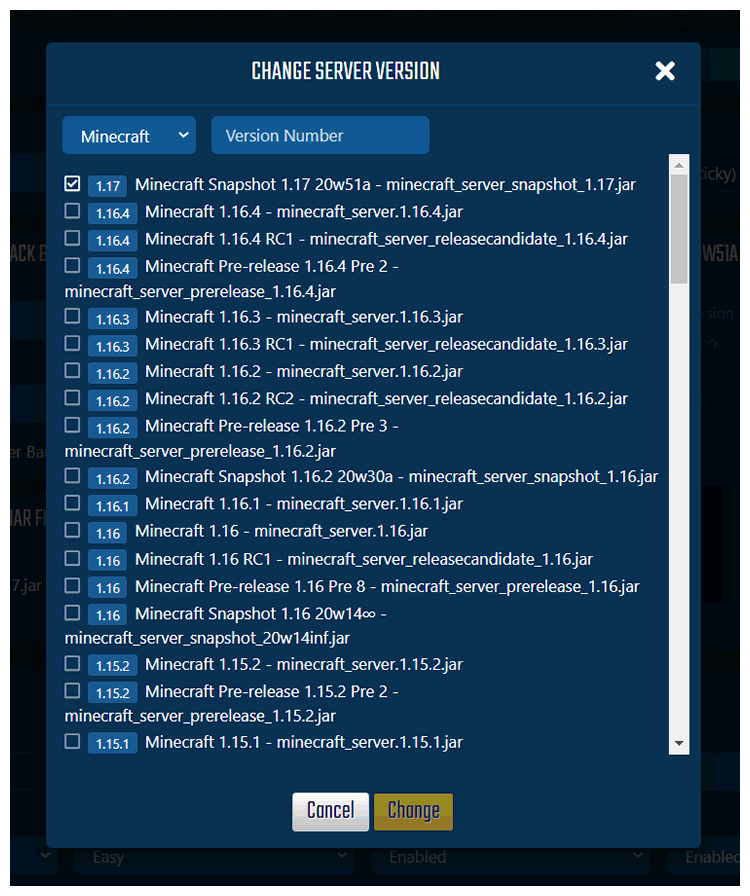
Changing Vanilla Minecraft Versions
You can easily change between vanilla Minecraft versions if you are running a vanilla, Spigot, or Bukkit server by following the steps below.
- Log into Multicraft.
-
Click the button below the biggest image that says
Instance Options -
Click
Change Versionin the menu that pops up. -
Select the new version you would like to change to.
STICKY NOTE
Do not select a version that is older than the world you are running, this can cause your world to corrupt and have problems.
-
Click the
Changebutton at the bottom of the popup.
-
If you are playing on a Vanilla Minecraft instance, you can switch between versions with the
Change Version. -
The instance will use the world that has already generated. Changing to older versions will remove all newer blocks.
For example; Terracotta from Vanilla Minecraft 1.12 will be removed from the world if the version changes to 1.11 or below.
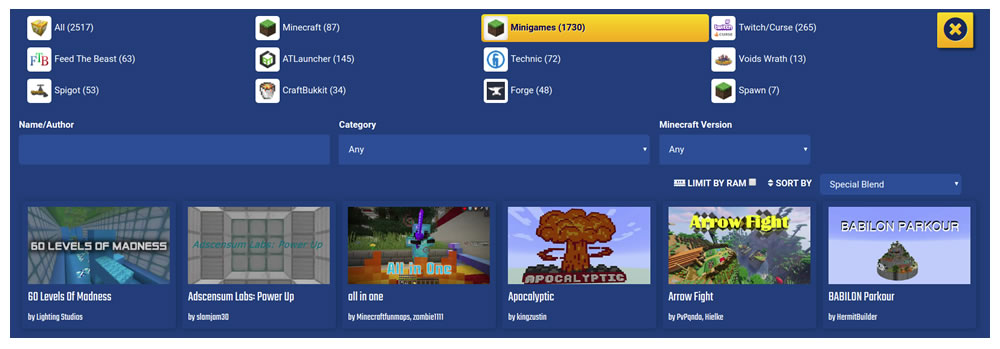
Installing Minecraft Maps
- StickyPiston has a large range of Minecraft Maps & Minigames available to all our server owners.
-
To access and install these, simply select
Minigamesfrom the server options at the top of the screen. -
Select and install each minigame in the same way that you would for a modded Minecraft or Vanilla instance.
Further Reading and External Links
StickyPiston Support
If you have questions about this guide or our Minecraft services, open a support ticket and our dedicated team will be in touch.
Open Support Ticket
