Snapshots are development releases of Minecraft, they often have lots of bugs, but also allow you to test out new features before they are released fully.
Creating The Minecraft Profile
In order to play on snapshot servers, you must be running the same snapshot version, otherwise it will not allow you to connect to the server.
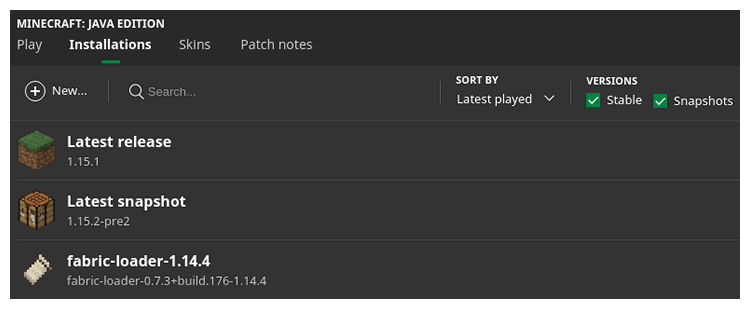
- Open your Minecraft launcher.
- Got to the
Installationstab at the top of the screen.
- Click the box to the left of the
Snapshotslabel underVersions, if it does not have a checkmark in it.
Note: Once the box has a checkmark in it, you should be able to find a profile namedLatest Snapshotif you cannot find this, check to make sure the correct boxes have checkmarks, and if that doesn't work, try closing and re-opening your Minecraft launcher. - If the server you are trying to connect to is running the most recent snapshot, you can hover over the profile and click
Playat this point in time. If you are trying to connect to a specific snapshot version, continue with these steps. - Remaining in the
Installationstab of the Minecraft launcher, click theNew...button. - Give the new installation a name that you will recognize, this can be anything from
Snapshot 19w53aordont dig straight downas long as the name has meaning to you. - Select the game version that is needed for the server from the
Versiondropdown. If you're unsure of what version is needed, ask one of the operators of the server or try the latest snapshot version. - Click
Createat the bottom right of the screen. - You are ready to start playing, hover over the profile and click
Play
StickyPiston Support
If this guide has not fixed your Minecraft server issues please open a support ticket and our dedicated team will be in touch.
Open Support Ticket
 US Multicraft
 EU Multicraft
 Aus Multicraft