This guide will walk you through how to install a Minecraft snapshot on your server so you can play development versions of the game with friends.
Minecraft snapshots are often released each week leading up to major releases. These versions are unstable and are often not recommended to use on servers due to how often they will often contain large bugs that may corrupt your world entirely. If you want a snapshot version on your server but don't want to risk breaking something else, reach out to our support team by opening a support ticket and we will do it for you!
Contents
- How are Snapshots Named?
- Auto Updating Snapshot Jar
- Use the Snapshot Auto-installer
- Installing the Snapshot Manually:
- Further Reading & External Links
How are Snapshots Named?
Snapshots are named using a very specific method, following the same pattern for all of them. The first two digits of the name are the last two digits of the year it was released. The "W" after that is just an indicator for the next part, representing the number of the week. The second two numbers in the name are the week of the year it was released, this will be anywhere from 01 to 52. The last letter in the name is used if they release multiple snapshots in the same week, starting at A.
An example snapshot name is 19W13B which would have been released in the year 2019, in the 15th week of the year, which would put it as the second snapshot release that week and released sometime between March 24th and March 30th, 2019.
Using an Auto-Updating Snapshot Server JAR
For information on how to use the StickyPiston automatic updating snapshot server, you can follow our guide about it in our article:
Updating Vanilla Minecraft Snapshots on Your Server
Use the Snapshot Auto-installer
You can make the control panel automatically download and run a specific snapshot version. This is done by setting the Server Jar name to one matching a specific pattern.
- Stop the server
- In the main page of the Multicraft control panel, find the button that says
Unlock Change Server Jarand press it -
In the text box, enter a Jar file name with the following pattern:
minecraft_server.<snapshot_version>.jar
For example:minecraft_server.24w38a.jar - Click
Update -
Click the
Show Advanced Settingson the main Multicraft page. -
Change the
Look for JARs insetting to beServer base directory - Hit the
Updatebutton at the bottom of the page. - Start your server.
Downloading The Snapshot Server
There are two ways to download the server file for snapshots:
-
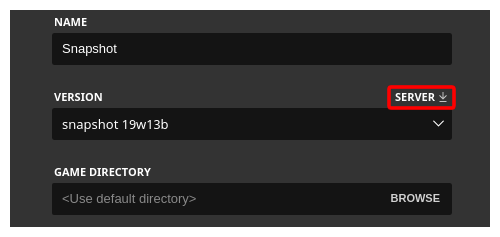
Through the Minecraft launcher: In the launcher profile of the snapshot you want to run the server in, you will see a button labeled "Server" and a down arrow beside it, press that to download the server file for the version you have selected.

- Through the Minecraft website: On the Minecraft website, they post articles explaining what they changed in the version, at the bottom of these articles, you will find a link to download a "Cross-Platform Server Jar", click the link to download the server file.
We highly recommend naming the JAR file that was downloaded something that indicates what version it is for, we typically like using minecraft_snapshot_VERSION.jar, and we replace VERSION with the version of the game it is.
Installing the Snapshot
Before starting these steps, make sure you have downloaded the server JAR for the version you want.
Note: If you set your server to use a snapshot file this way, it will not automatically receive updates when a new snapshot comes out.
- Stop the server
-
Connect to the server using FTP.
Note: For help on using FTP, read our article about how to use FTP to upload files to your server. - Upload the previously downloaded server jar file to the root (the main directory) of the server.
-
Rename the Jar file following this pattern:
minecraft_snapshot_<minecraft_version>.jar
For example:minecraft_snapshot_1.21.2.jar
The control panel will use this to make sure the correct version of Java is used to run the server. -
In the main page of the Multicraft control panel, find the button that says
Unlock Change Server Jarand press it, in the text box right above it, enter the name you noted down in the previous step, including the.jarpart of it.

Make sure to use the name of the file you uploaded. -
Click the
Show Advanced Settingson the main Multicraft page.

-
Change the
Look for JARs insetting to beServer base directory

- Hit the
Savebutton at the bottom of the page. - Start your server.
Further Reading & External Links
StickyPiston Support
If you have questions about this guide or our Minecraft services, open a support ticket and our dedicated team will be in touch.
Open Support Ticket
 US Multicraft
 EU Multicraft
 Aus Multicraft