Notepad++ is free software that allows easy editing of configuration files for your server.
The NppFTP plugin adds functionality for browsing, downloading, editing and uploading text files for your server.
This guide will explain the installation and usage of the plugin to improve your server management experience.
Contents
- Installing Notepad++
- Installing the NppFTP Plugin
- Configuring the NppFTP Plugin
- How to Use NppFTP
- Configuring Notepad Tab settings for YAML files
- Further Reading & External Links
Installing Notepad++
Download Notepad++ from the official website and follow the installation process:
Download Notepad++
STICKY NOTE

Notepad++ is an excellent text editor! It adds line numbers, syntax highlighting, and has a wide variety of plugins that will make running a server and editing files a lot easier.
Installing the NppFTP plugin
-
Download the NppFTP plugin from the Sourceforge site:
NppFTP Plugin download -
Extract the
.zipthat you have downloaded. -
Open Notepad++.
Note: Some users may need to run the program as an Administrator for the following steps to work correctly. -
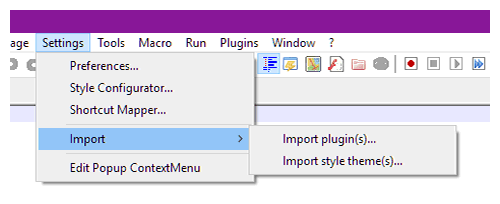
In the toolbar at the top of Notepad++ select
Settings>Import>Import Plugin(s)...
-
Navigate to the download location and find the
binfolder inside the extracted download. -
Select
NppFTP.dlland clickOpen. -
In the Notepad++ toolbar click
Pluginsand check thatNppFTPis in the list.
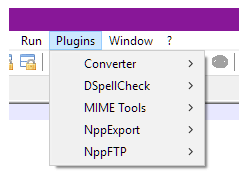
If you do not see it then close Notepad++ and reopen it with administrator permissions before repeating the process
Configuring the NppFTP plugin
-
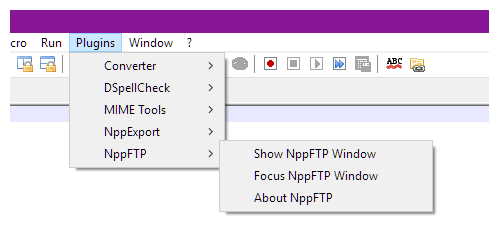
From the menu:
Plugins>NppFTP>Show NppFTP Window.
-
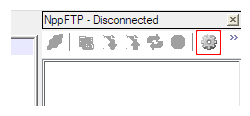
In the NppFTP panel, click the cog icon and choose
Profile Settings.
-
Click the
Add Newbutton.
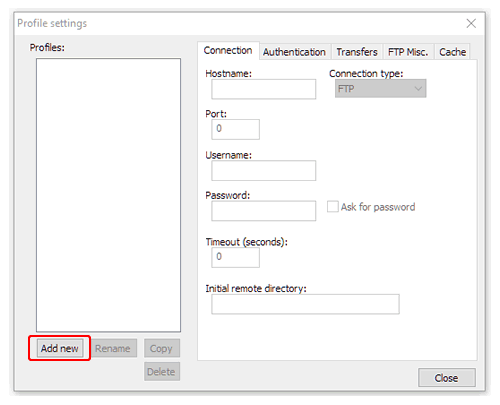
-
Enter a name for the profile and click
OK. -
In the
Profileslist, highlight the name of the profile you entered. -
In the
Connectiontab enter theHost,UsernameandPasswordfor your FTP connection.
You can find the details needed by expanding theFilessection in the Multicraft left side menu, and clicking on theFTP File Accessbutton.
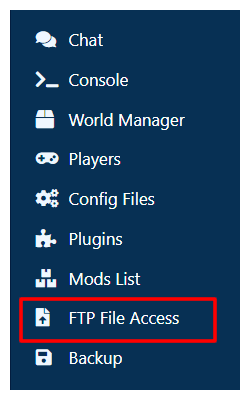
-
Click
Close
How to Use NppFTP
-
Click the blue
Connecticon and choose the name of the profile you made. - NppFTP will attempt to connect to the FTP server and return a directory listing in the right hand window.
- Double click a file to download and open it in the editor.
- When you save a file, NppFTP will automatically upload it to the server for you.
Configuring Notepad++ Tab settings for YAML files
STICKY NOTE

YAML is a simple data format used by Minecraft plugins from all over the internet.
Once you learn the basics, you'll be able to manage your plugin configurations with ease
By default pressing the Tab key in a YAML file will insert a tab character.
However YAML uses a double space rather than a tab and this can cause issues when your server attempts to read the files.
Follow these steps to make sure that the files can be read correctly by your server.
-
In the Notepad++ toolbar select
Settings>Preferences
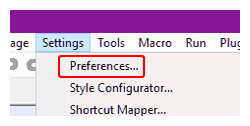
-
In the list on the left highlight
Language. -
Scroll down the list on the right under the
Tab Settingsheading and selectyaml -
Uncheck the
Use default valuebox. -
Check the
Replace by spacebox. -
Click on the number next to
Tab size: -
In the box that appears, change the number to 2 and press enter.
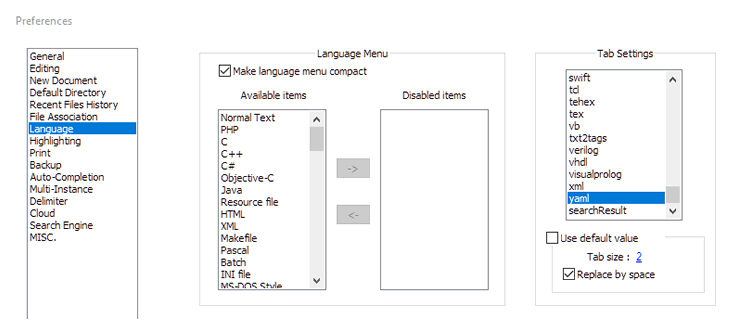
-
Click the
Closebutton.
Checking for errors in YAML
Stickypiston offers an error checker for yaml and json files right in Multicraft. To use it follow these steps.
-
In the main Multicraft server window (Where the IP, Players and Memory Usage are displayed) click on
Filesin the left hand menu. -
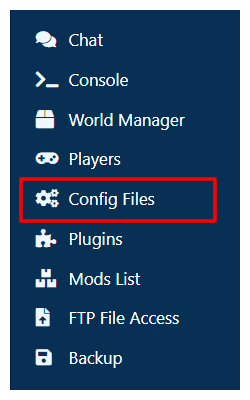
Click on
Config Files.
-
Use
Name,FileorDescriptionboxes to search for your config file and click on it to open. -
Beneath the text editor that opens there is a
Savebutton. - Errors will display below this button with a short description of what is not working and the line number in the file that causes the problem.
Further Reading & External Links
StickyPiston Support
If you have questions about this guide or our Minecraft services, open a support ticket and our dedicated team will be in touch.
Open Support Ticket
 US Multicraft
 EU Multicraft
 Aus Multicraft