When you become a server owner you may want to upload your singleplayer world to use online. This guide will show you how to accomplish this using FTP to upload, manage, backup and restore your world.
Contents
- Quick Guide
- First Steps
- Changing Your Server World File
- Additional Tasks
- Troubleshooting
- Further Reading & External Links
Quick Guide
This is for more
experienced users
who are familiar with FTP Access and server management.
For a more
detailed explanation
start with
First Steps
below
-
Locate your local
savesfolder and zip the world save that you wish to use.
Remember that you must use.zipformat to upload through Multicraft..rar,.7z, etc. will not work correctly. - Upload the zipped folder to your server’s root directory.
-
Stop your server
and use the
Backup/Restorefunction to unzip and manage the world. If you uploaded your world through Multicraft under the archive section, the archive will automatically be restored. -
Change the
Worldfield in the Multicraft server page to match exactly the name of the uploaded world
Note that capitalisation , spaces and punctuation are all included in the world name and will make it not work if they do not match exactly . - Start your server.
First Steps
Make sure that you are familiar with the following aspects of server management before you continue with this guide.
- How To: FTP Access to Download and Upload files
- How To: Restore a Minecraft World From a Backup
- How To: Edit the Server.properties File
Changing Your Server World File
Preparing a World Save
All uploaded worlds must be stored in a .zip archive before uploading with Multicraft.
-
Find your local
savesFolder for Minecraft. See How do I find my Minecraft Folder? for more information. -
Within your
savesfolder, locate the folder that has the name of the world you created in Minecraft. -
For
Windows users
, right click, select
Send Toand then chooseCompressed Folder. -
For
Mac and Linux users
, right click and choose
Compress. -
This will create a zipped folder that can be uploaded
Remember that you must use.zipformat to upload through Multicraft..rar,.7z, etc. will not work correctly .
Uploading the World Save Files
This section covers FTP Access through the Multicraft control panel. See our guide on how to upload and download files using FTP for more information.
-
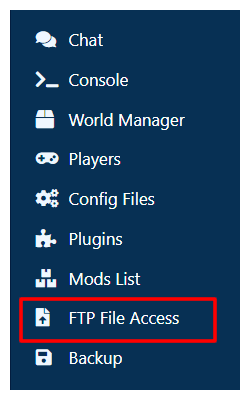
Within the Multicraft server window, click
FTP File Access
-
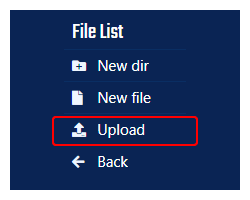
On the left hand menu select
Upload
-
Choose the zipped archive that you just created, to upload from your PC and
make sure the
Upload to Directoryfield contains only a/
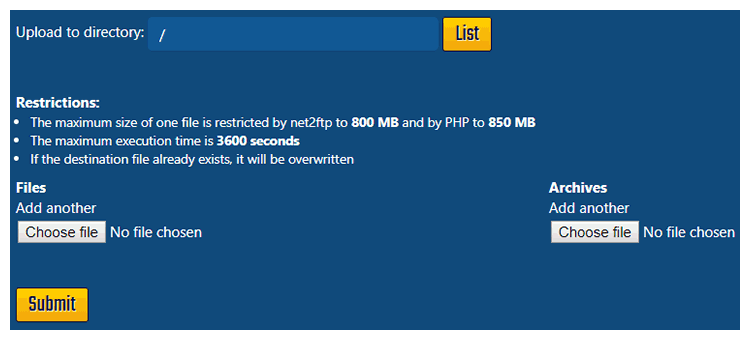
A single forward slash (/) represents the root directory of the server, uploaded saves must be put here to function . - Once the process is completed you can return to the server's main screen in Multicraft.
STICKY NOTES
Uploading unzipped files and folders is possible. It will take a long for large worlds and folders to finish the process. This is why we recommend zipping them up.
Restoring the World File from Your ZIP Archive
Once the files are uploaded we can use the
Restore/Backup
function in Multicraft to enable them for your server.
- Stop your Server.
-
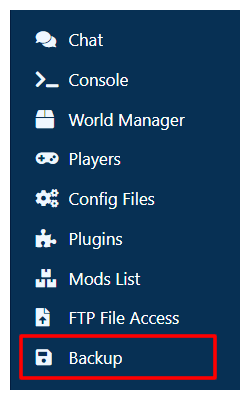
Click on
Backupin the navigation menu.
-
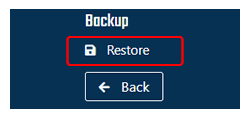
Select
Restoreon the left hand side of the page
-
Click on
Restorenext to the zipped archive that you just uploaded

-
You will receive a
warning
saying that some files may be overwritten. Click
Okto continue.
This warning appears because some of the server files will be overwritten by the versions found in the uploaded map - The process will take a few moments and completes in the background.
- You can check that the file has been successfully restored by locating a folder that has the same name as your zipped upload.
- If you have any issues at this point check Troubleshooting below.
At this point, it is safe to delete the original world folder if you will not be using it again. Remember that if you do this the steps for restoring your original world below will not work unless you have world backups .
Additional Tasks
Using a Custom World Name
Now that the world has been uploaded and restored from the zip folder, you will need to change one of your Multicraft settings so that the server knows which world to use.
- Make sure you are on the main server window which displays player slots, RAM usage, CPU usage, and a variety of other items.
-
Underneath the information about player slots, server address, etc. you will
see a field labeled
World. This is the name of the folder that the server will use as the world.

-
Change the name in this box to match exactly the name of the folder that you
uploaded and selected with the restore function
The server will recognise capitalisation , spacing and punctuation so keeping the file name simple will make this process easier. -
Scroll down the page and click the large
Savebutton. - Start your server and make sure that it runs successfully with the map installed.
Reverting to Your Old World
If you wish to change back to the world that you were using before the upload, follow the steps below
- Stop the server.
-
On the main server page, find the
World
setting and set it back to the name of the world that you would like to use.
By default, Minecraft will use
worldas the name for the world folder. -
Click the
Savebutton at the bottom of the page. - Start the server.
If you have any problems at this point check the Troubleshooting section below.
Troubleshooting
-
The default Minecraft worlds are always called
world, because of this, it can sometimes cause problems when uploading a singleplayer world that uses the standard names.
We recommend changing the world that you are uploading to a unique name so that you can distinguish it in the restore/backup window and prevent any unexpected errors. -
This also applies if you have given your normal server world a unique name.
When reverting to it, you will need to type that custom name into the world field rather thanworld.
Further Reading and External Links
- How to: FTP Access to Download and Upload files
- How to: Restore a Minecraft World From a Backup
- How to: Edit the server.properties File
- How do I find my Minecraft folder?
StickyPiston Support
Whether you own a server with StickyPiston or don’t, we are always
happy to help
with
any and all issues
you may be having. Open a
support ticket
with our team and we will be in touch.
Open Support Ticket
 US Multicraft
 EU Multicraft
 Aus Multicraft