If you play modded Minecraft there may be times that you want to adjust a modpack by adding mods to it.
This guide covers all the steps to take when adding mods to existing modpacks on your home PC.
This covers steps to take when using the vanilla Minecraft launcher as well as a variety of modded Minecraft launchers.
There is another article available that goes through the process of adding mods to your modded Minecraft server.
Contents
- Quick guide
- First steps
- Adding mods to your Local Minecraft files (Client)
- Adding the mods to your modded Minecraft Server
- Troubleshooting
- Further Reading and External Links
Quick guide
This is for more experienced users who have used modded games in the past, are familiar with their chosen launcher and just wish to know the steps to follow. For a more detailed explanation start with First steps below.
- Open your launcher of choice.
-
Select the correct
profileorinstanceof Minecraft. -
Navigate to that instance’s
modsfolder. - Copy and paste the new mods into the folder.
- Launch your game.
First steps
Finding your Forge/Minecraft version
The most important step when installing mods locally (or to a server) is checking that the mod is supported on both the Minecraft version and Forge version that the modpack uses.
- You can find the modpack's Minecraft version (in most launchers) in the pack/instance description.
- You can find the modpack’s Forge version (in most launchers) by opening the packs advanced information panel or in the pack/instance description.
For example, the Twitch launcher displays the Minecraft version at the top of the mods list for the modpack and the Forge version can be seen in the Profile Options window that opens when unlocking your pack to add mods.
Example mod
Storage Drawers is a popular mod that is used in a lot of Minecraft modpacks across a range of Minecraft and Forge versions.
You will need to download the correct version of it from your site of choice. We recommend Curseforge.
- Check the mod version is a Release and not Beta or Alpha .
- Check the mod supports the Minecraft version that the modpack is running.
- Check the Forge version requirements of the mod.
Here is the Storage Drawers mod overview page on Curseforge: Storage Drawers on CurseForge
Selecting the Files tab will display a variety of versions and options for the Mod: Storage Drawers Files
Double-check that the file you select and download is the correct one for the modpacks Minecraft version and Forge version.
STICKY NOTE
It's always worth reading a mods description and comments sections (as well as the issue tracker). Sometimes it will highlight requirements, bugs, and common answers that other players are having.
Adding mods to your local Minecraft files (Client)
Some modded Minecraft launchers will require you to download the files to your PC, others will allow you to do that in the launcher.
Scroll through the options below to find the launcher that you use and add mods to the modpack.
Adding mods using the Twitch/Curse launcher
- Start the Twitch launcher.
-
Click on
Mods

-
Click on
Minecraft
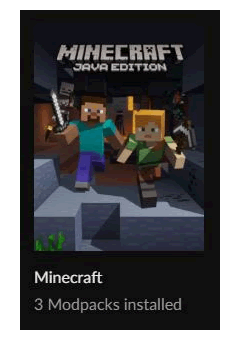
- Click on the profile that you wish to add mods to.
-
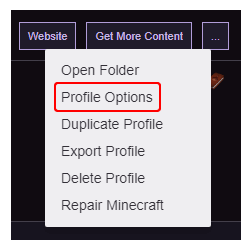
Click on the
...in the top-right corner and selectProfile Options
-
Make sure the
Lockedtickbox is unticked allowing edits to be made to the modpack

-
Exit the
Profile Optionswindow. -
Click
Get More Contentnext to the.... - Search and select the mods you wish to add. The launcher will automatically download them.
-
Launch your game.
If there is a crash or problems loading, check the Troubleshooting section below.
If you wish to add a mod manually to the Twitch launcher then follow these steps.
- Follow steps 1 to 3 above.
-
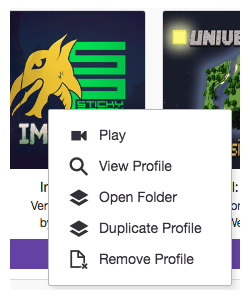
Right-click on the profile that you wish to add to and click
Open Folder
-
Navigate to and open the folder named
modsin the modpack’s root directory. -
Copy and paste the downloaded mod into the folder
It will now appear in the Twitch launcher along with the other mods in the pack. -
Launch your game.
If there is a crash or problems loading, check the Troubleshooting section below.
Adding mods using the Technic launcher
- Start the Technic launcher and choose the modpack.
-
Click the gear icon next to
Modpack Options

-
Click the
Openbutton next to the modpack file path

-
Navigate to and open the
modsfolder. - Copy and paste the mod that you downloaded into that folder.
-
Launch your game.
If there is a crash or problems loading, check the Troubleshooting section below.
Adding mods using the ATLauncher
-
Start the ATLauncher and click on
Instances. -
Click
Edit Mods

-
Click
Add Modand navigate to the mod that you are tying to add
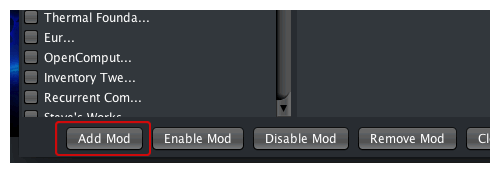
- Confirm all the changes and close the mods window.
-
Launch your game.
If there is a crash or problems loading, check the Troubleshooting section below.
Adding mods using the Feed The Beast launcher
- Start The Feed the Beast launcher and choose the modpack.
-
Click
Edit Mod Pack
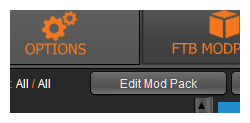
-
On the bottom right of this window, click
Add Mod

-
Locate and add the mods you downloaded
They will automatically appear in the left-hand column. - Confirm all the changes and close the mods window.
-
Launch your game.
If there is a crash or problems loading, check the Troubleshooting section below.
STICKY NOTE

We recommend you make a backup of your world files before adding mods so that you have something to go back to should the changes cause problems or crashes. Click the link below to find out how to make a backup.
How to Backup your Minecraft world folder
Adding the mods to your modded Minecraft server
Mods can also be added to packs that run in multi-player environments on servers.
This alternate article shows the steps required using either the Multicraft control panel or alternative FTP software.
How to: Adding additional mods to your modded Minecraft server
Troubleshooting
When adding mods to existing modpacks there is a chance that something will go wrong, these are some of the most common issues that occur.
Keep in mind that some mod authors will have customised and adjusted their pack to work exclusively or in a more integrated way with the mods that it comes with when installed and support for additional mods may not exist.
IndexoutofBoundsException
java.lang.IndexOutOfBoundsException
    at java.nio.Buffer.checkIndex(Buffer.java:532)
This error may relate to an issue with the configuration files of the new mods. The quickest way to test this as the cause is to delete the configuration files of the mods that were added and then run the modpack again to allow new configurations to generate.
If this doesn’t work, the error is being caused by something else.
Firstly check the issue tracker, bug reports and comments sections for the mod to see if it is a common error or unique to you.
If you do not find a solution, open a support ticket with the mod author giving details of the error.
MissingModsException
cpw.mods.fml.common.MissingModsException
    at cpw.mods.fml.common.Loader.sortModList(Loader.java:218)
This error is an indication that either the mods list on your local computer and the server aren’t the same as each other or that the mods in them have different versions.
Usually, this error will be accompanied by a mod and version number. Make a note of this before checking your local files and your server files for that mod to make sure they match.
Occassionally a crash may be a little more in-depth and related to a specific mod being broken or some other more technical issue.
We always recommend checking the mod's support, issues and comments pages to see if anyone else has suffered the error and potentially found a solution.
As well as sending a message or opening a ticket with the mod author if a fix is not clear.
Further reading and external links
- How to backup your Minecraft world folder
- Adding additional mods to your modded Minecraft server
- Download the Twitch/Curse Launcher
- Download the Technic Launcher
- Download the ATLauncher
- Download the FTB Launcher(Make sure to click
Legacy Windows) - Curseforge mod database
- Storage Drawers on CurseForge
StickyPiston Support
If you use our services or not, we are always happy to help. Open a support ticket and our dedicated team will be in touch.
Open Support Ticket
 US Multicraft
 EU Multicraft
 Aus Multicraft